In this page I’ll show you how to build the various sensors required to play my Accessible Digital Musical Instruments.
§ THIS SECTION IS CURRENTLY BEING WRITTEN! CONTENTS ARE INCOMPLETE!
Netytar’s Breath Pressure sensor
§ IMAGES COMING SOON
Cost: around 30€/35$, depending mostly on which microcontroller you choose;
Components: I’ve included links to sample components to take a look at them, but you can find them elsewhere on other shops, sometimes even at better prices.
- Arduino microcontroller (Uno, Nano, whatever. Elegoo makes cheaper compatible chips);
- USB Type A to Type B cable (to connect Arduino to your PC. Often included with Arduino);
- MPX 5010DP low pressure sensor (or an equivalent 10Kpa low pressure sensor);
- At least 3 male to female (or female to female if you choose Ardino Nano) jumper wires for microelectronics, to connect Arduino to the sensor. I’ll reccommend to buy a set of wires;
- 70-80cm long, 5mm wide rubber tube (you can find them at a DIY/Bricolage store, under irrigation);
- A short (around 10cm long) PVC tube, and a set of small compatible pipe junctions (to make changeable mouthpieces);
- A small (3x3cm) piece of cloth (you can cut it from an old t-shirt or something like);
- Strong insulating tape;
- (Optional) a small box to contain Arduino and the pressure sensor.
Procedure:
- Download the necessary Arduino sketch file from my NeeqSensors GitHub repository. Refer to the Readme on the bottom of the page for download instructions;
- Following those instructions, install the Arduino IDE software (or use an equivalent method) and use it to compile and upload the sketch to your Arduino;
- Using the jumper wires, connect the MPX 5010DP low pressure sensor to Arduino, following this scheme (image source):
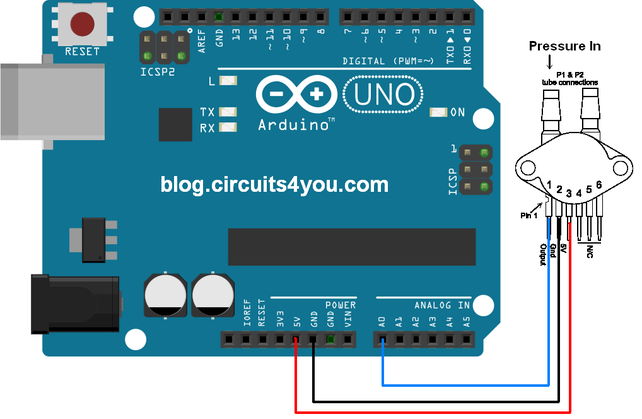
- Insert the 5mm wide rubber tube in the “pressure in” input of the MPX5010DP, indicated in the image;
- At the other end of the rubber tube, place the 10cm long PVC tube. Use tape to insulate it, such as no air can pass outside the rubber tube when you blow in the PVC tube;
- Place the cloth air filter on the top of the PVC tube and block it using the PVC pipe junction adapter. The air filter will prevent moist and saliva from getting into the rubber tube and damage the MPX 5010DP;
- (Optional) encapsule Arduino and the sensor in a box. I personally used a 2€ plastic Tupperware, where I put both Arduino and the sensor, and I cut an opening for the rubber tube and the USB cable to come out.
The sensor is ready. Enjoy! Connect the Arduino and the USB cable to your computer, start Netytar and switch the COM port using the COM port selector on the interface, and start playing.
Netychords’ Head Movement sensor
§ IMAGES COMING SOON
Cost: around 25€/29$, depending mostly on which microcontroller you choose;
Components: I’ve included links to sample components to take a look at them, but you can find them elsewhere on other shops, sometimes even at better prices.
- Arduino microcontroller (Uno, Nano, whatever. Elegoo makes cheaper compatible chips);
- USB Type A to Type B cable (to connect Arduino to your PC. Often included with Arduino);
- MPU 6050 accelerometer/gyroscope chip. You can order it online for around 5-10€ on microelectronic shops/stores;
- At least 5 male to female (or female to female if you choose Ardino Nano) jumper wires for microelectronics, to connect Arduino to the sensor. I’ll reccommend to buy a set of wires;
- (Optional but strongly recommended) a soldering iron. You can… ehrm, force the connection of the MPU to Arduino using tape, I made it work once, but maybe it’s not the most elegant solution;
- Something head-wearable where to put arduino and the MPU chip. I used an old headphone set, and I will refer all the examples in the following procedure on that;
- Strong insulating tape.
§ PROCEDURE COMING SOON